Wednesday, 28 March 2012

Oriental Fans

Hi all. It's been a while since I've blogged. It's been a little hectic here.  The in-laws are staying with us for the month and I've had to run around getting documents ready for our Easter holiday. We'll be leaving this Saturday to Shanghai and Japan for a one week cruise. Yay!! We are seasoned cruisers and try to go on at least one sailing per year. There are still plenty of destinations we haven't been to yet which are on the short list; Alaska and the Med are my two.

In between all of this, I've been doing a couple more little projects for kid's classes, which I will put up later once the classes have been done next month.

Back to this one. I've been so excited to get my Bo Bunny Serenity collection papers, that I had bought a plain wooden fan shaped ornament to decorate before the papers even came in to the shop. When they finally came in, I had to have one of everything they ordered. I've wanted to do a Chinese/Oriental inspired project for a while and these papers, with their Chinese characters and cherry blossoms, are the perfect foil for the fan.

My standing wooden fan ornament featuring Bo Bunny Serenity line.
Prep your wooden board and stand. I sanded the edges to get rid of rough edges and brushed on two coats of gesso, then let it dry.
I then painted the sides with Distress crackle paint; first with Antique Linen to give the bottom colour and then with Tarnished Brass (my favourite Distress crackle colour) and let the whole thing dry and crackle up before mod-podging with the papers and layering the accents on top.

The back, I covered in a beautiful blue paper from the Serenity line.
Using several types of mediums, I either embossed or crackle distressed the lanterns. For the cameo insert, I cut some of the paper to fit inside and added several layers of Glossy Accents. The Chinese embroidery fastening was sprayed with Glimmer Mists to change it from white to a colour that matched the other accents. All chipboard accents were edged with gold paint.
I hand cut a floral design from one of the papers to lay on the left side of the fan. Under that is a subtle image of cherry blossoms and birds that I stenciled on and filled in with gold Perfect Pearls. The blossoms on the top right of this picture were outlined with Stickles in Star Dust. Gold splash specks were made with Adirondack Gold Acrylic Paint Dabber mixed with water and flicked off a brush.

I initially thought to place a couple of photos into the design but decided against it and kept it purely as an ornament. This way, it will not date with the photos and makes a lovely focal piece on my sideboard.

Products Used
Papers and chipboard from Bo Bunny Serenity Collection
Distress Crackle Paints, Dabber paint, Stickles, Perfect Pearls, Glossy Accents and Liquid Pearls all from Ranger
Metal accents, wooden fan and embroidery fastening sourced locally

Monday, 19 March 2012

A Little Birdie Told Me

Here's something a little different. As some of you know, I also teach a kid's scrapbooking class, where we do layouts, mini albums and other paper crafts. It being the last lesson of the current term, I wanted to do something a little different for them, so Carla of HKMC and I thought of doing a little jewelry project.

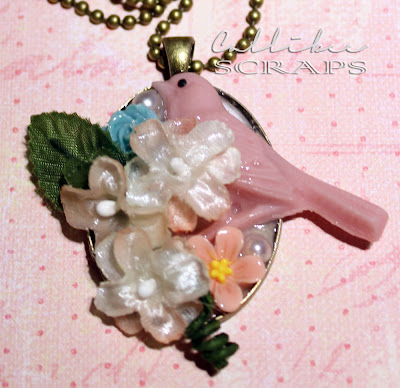
I wanted to go for a more "Spring" like theme, and had these little birds to inspire me. Everything is glued down with Diamond Glaze by Judikins. It works similarly to Glossy Accents by Ranger, but I find it dries clearer for these kind of projects. You can layer the glaze without losing your detail underneath and you can even glaze your fabric so the whole piece will harden and be waterproof.

With just a few items, you can create a gorgeous piece of jewelry, which makes a great gift for Mother's day.
My finished necklace. I cut an oval of patterned paper to line the bottom and glazed it down. All other elements were layered on top.
A bracelet made to match with the same paper underneath. I added an initial charm to personalize it.
Definitely a cute project and gift idea for kids or adults alike.

Products Used
Patterned paper by Little Yellow Bicycle Elizabeth Park Collection
Adhesive by Diamond Glaze by Judikins
All jewelry hardware and trinkets sourced locally

Saturday, 17 March 2012

I'm Lovin' It

I had said previously that I wanted to do hubby's birthday layout with some of the My Mind's Eye Follow Your Heart paper line, so here it is. There are two colour palettes to these papers; blue "Be Amazing" and pink "Be Happy", however, all the papers can be used interchangeably and will match perfectly with each other. For this layout, I stuck to the "Be Amazing" collection and I wanted to give it a more geometric feel rather than the free-form layout that I did for the Rejoice layout.

Cutting around the patterns highlighted the different geometric patterns of each paper. Adding a separate accent on the left edge of the paper balances out the page.
I raised each paper layer with pop dots to add more dimension to the page. A We R Memory Makers Crop-A-Dile Big Bite was used to punch out the little holes in the blue paper.
Make little tags of different shapes to contrast. Each element was inked around the edges to give it more definition.
Adding the same elements around the page (brown twine on the the clip and buttons, mini lace stamp) tie the layout together.
Products Used
Papers, buttons, clip, stamp all from My Mind's Eye Follow Your Heart Collection
Distress Ink in Walnut Stain from Tim Holtz by Ranger

Thursday, 15 March 2012

Easter Fun

Easter is fast approaching and apart from the religious connotations it brings, it also signifies spring and all things new. I love how all the colours of nature come back to life after a dull and dreary winter and we can pack away the bulky sweaters again.

I must really be missing the sun, for as I write this, there has been nothing but four solid months of overcast and cold weather here. Oh well, if I can't get it for real, I can still put it on a page, right?  I had originally pulled out this kit to use for Miss C's birthday but I'm glad I kept it for this. With gorgeous pastels and cute patterns, it has really brightened up my day.  The pictures are from an Easter picnic and egg hunt we did with friends last year. I remember the weather being nice and warm by this time last year so I hope we will see the same very soon.

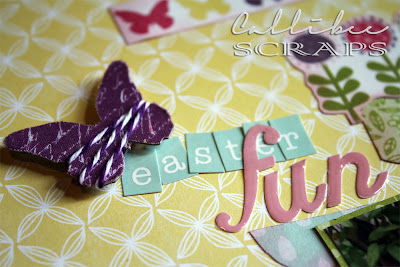
Pretty pastels scream spring is here. I layered several pieces of patterend papers from the same line under the photos, giving each piece a different edge.
When placing accents, always go for odd numbers, or the rule of three.
I wound matching coloured twine around the raised chipboard accents to give it that extra element.
Add a string of pearls to your banner to make it pop a bit more.
Here's hoping for the sun to come out soon.

Products Used
Papers and letters from Echo Park 2011 Springtime Collection
Chipboard canvas accents from My Yellow Bicycle Fabric Favorites Elizabeth Park Collection
Twine and pearl beads from my stash
Distress Ink in Spun Sugar from Tim Holtz by Ranger

Double Arches vs Teacups and Pearls

Wow! It has been quite the week here. I haven't been able to do any scrapbooking for the last two weeks as this had to put aside for "Mad March", as I like to call it. Although this post isn't about scrapbooking, I thought I'd post this so you could see what I was up to the last few days.

First off was hubby's birthday on the 10th. He insisted on going to the double yellow arches to celebrate. Yes, we are talking about a 41 year old's birthday party at McD's. There is an explanation of sorts behind this decision though. Hubby is a diabetic and therefore has to follow a stricter diet (one which falls to the wayside a lot, but I didn't say that, OK)? So, he decided that he could be bad on his special day and indulge in a bit of junk food. After two large burgers, fries, onion rings (yes, they do them here), chili wings, a box of nuggets and a large diet cola (this is what he ate, not me), he exclaimed that maybe this was not such a great idea. Really? Well too bad, here's another burger for you. This time, it wasn't made of ground up beef carcasses but of sugar and chocolate.  So, there we were, surreptitiously singing happy birthday and cutting a burger cake in the middle of McD's, hoping the staff would turn a blind eye to the whole shenanigans (which they did).

This burger went down a lot better, even if it was loaded with sugar and no spice and everything nice.
Happy birthday to my dear DH.

The next birthday belonged to our daughter, little Miss C, which I decided would be nice to have the day after DH's as her actual birthday falls on a hump day. This one took up all my event planning skills (of which I have none). She wanted a tea party, so I spent the whole week prior cutting, printing, pasting invitations, banners and labels while scouring the whole of Sham Shui Po for goody bag items and game prizes. There was also the cake to be made, food to plan and manic weather watching.

Invitation cards. I traced around a chipboard book teacup by Studio18, cut them out, added different patterned papers to define the saucer and lip of the cup, added a some flowers and a felt cupcake to finish it off.
I had very much wanted to hold the party outdoors at the park opposite our abode, where I had all sorts of fun games planned, like sack races and croquet, however, the weather never let up. Good thing we stayed inside as the rain unleashed its fury halfway through the proceedings.

Miss C insisted on a girl's only party, "No boys allowed", so I do apologize to friends with boys who were not invited to the festivities. Being a tea party, I think boys would have thumbed their noses at all the pink and yellow anyway.

For the food, I stuck to a high tea menu of scones, mini cucumber sandwiches, little puff pastries, macarons and other bite size treats. Fresh lemonade and hot chocolate with marshmallows were the drinks of choice.

The tea party table, themed in pinks and yellows, with the large teapot cake as the centrepiece.
The banner on the wall was made with the Sizzix #8 tag die and EK Success butterfly punch, while the letters were cut out with my Cricut Doodletype cartridge.
I designed and printed some tags to wrap around toothpicks and stuck them in the food.
I arranged a few games, croquet (on the rug), hit the queen of hearts, a stacked teacup race, and the most popular one, a treasure/scavenger hunt. For this one, I had arranged to hide the goody bag items in and around the estate where we live and the girls had to find them following my guide map. I think this went down well and they all loved the items they found.

Miss C doing the teacup race.
A little badge label for the goody bags.
We ended the party with a round of birthday cheers and a slice (or two) of the teapot cake. We didn't really celebrate on her actual day (yesterday) but I have booked a Little Princess make-over and dim sum lunch at the Disneyland Hotel this coming Sunday, which she can enjoy with her grandparents, who flew out especially for her birthday.  Happy Birthday, my little darling girl.

Whew! That's another party over with. We might be giving the Easter one a miss as we are going away but Halloween is on!

Friday, 2 March 2012

Tim Holtz's 12 Tags of 2012 - March

Tim Holtz, one of my heroes, used to do a 12 tags of Christmas, but he recently changed his format to 12 tags of 2012, featuring a tutorial once a month on his blog. Last month was the Valentine's tag I did here, and this month, he upped the ante by doing a faux mosaic effect. I followed as closely as I could with the materials I have.

I wanted to use a brighter "grout" for the butterflies just to give it the contrast and I love the Inkadinkado flower stamp on the background.
This was a quick fifteen minute project but the possibilities with the mosaic effect is endless and you can adapt the technique to any die cut shape to give it that amazing look.

Products Used
Grungeboard, distress inks, tag die and butterfly dies all from the Tim Holtz range
Flower Stamp by Inkadinkado
Glossy Accents by Ranger
Trinkets and ribbon sourced locally

You might also like

Related Posts Plugin for WordPress, Blogger...