Thursday, 28 March 2013

A Little Bit of Easter

Hi all,

Looks like it's going to be a rainy Easter over here. Forecast calls for wet days for the whole week. A bunch of us, families with kids of similar age, have organised a picnic and egg hunt for Monday, but at this rate, it may be a wash out.

Kids are on their Easter breaks right now and trying to keep them busy indoors is no small feat. At the moment, Miss C is parked in front of hubby's laptop, playing Club Penguin. We've already decorated eggs and were meant to go out today, but it just bucketed down. Nixed that plan. I guess spring showers (read torrential rain), are here.

Meanwhile, I've been coming up with a couple of Easter projects to celebrate this coming holiday. Remember, I did some Easter cards a few days ago. This time, I've been making use of the eClips again and also, altering chocolate packaging.

Altered Chocolate Egg Case
Turn this...
 Into this. 
Where else could you find a more appropriate egg to fill with some spring flowers and birds?
 Super simple project, curl some straw into the base and stick lots of flowers into it. Add a couple of wooden birds. Trim the opening with pretty pink velvet and a small string of paper banners, before adding a tag. Easy as that. Oh, and try not to eat all the chocolates that came with the egg case in one go - not so easy.

Products Used
Egg case from Ferrero Rocher 
All flowers and wooden birds from a selection by Prima Marketing
Trim sourced locally
Tag cut with Spellbinders die
Pink canvas letter by Prima Marketing 


For this Easter basket, I designed my own SVG file, which I'm sharing with you.  All you have to do is click on the last image, download and then import the SVG into your eClips or other die-cutting software system, and cut it out. The bunny was modified from a stock photo and I turned it into another SVG.

Cute Die Cut Easter Basket
This would make such cute little Easter gifts. Just cut out the patterns and stick together, add some flowers and a pretty ribbon. Measures 11.5cm x 12.5cm (4.5" x 5")
Fill it with a bed of straw and a handful of chocolates.
Click on this image to download your SVG files

Hope everyone has a wonderful and dry Easter,


Tuesday, 26 March 2013

Cards Weekend

Shhhh.....

I have a confession. I love scrapbooking, but I'm not a card maker, and don't tell, but I mostly buy my cards, rather than make them. I find I'm not the only one. A lot of scrapbookers I speak to, say the same. I guess it's because it's something you would give away and are afraid that the recipients would not appreciate them as much you did, making them.

This past weekend, I've been sitting down and making cards, mainly to try out the new Spectrum Noir alcohol pens that will be coming into HKMC. While at CHA, we tested out several brands, and liked this one the best. They blend well together and has a great price advantage over some better known brands.  The coding system is also easy to follow and they come packaged in colour groups, which make take out the guess work on which colour families will blend together well.  Their website also give comprehensive tutorials on how best to use their pens as well as an extensive inspiration gallery.

Birthday Cards
 L-R: Stampers Anonymous Birthday Blueprint stamp, Stampers Anonymous Easter Blueprint stamp, butterflies cut with eClips, Suzi Blu girl stamp

Easter Cards
L-R: Easter card cut with eClips, Stampers Anonymous Easter Blueprint stamps

I'm going to play around some more with these pens and hopefully will be able to do some more demos for the shop soon.

Thanks for dropping by,


Saturday, 23 March 2013

It's Your Party - Layout

Hi there,

Can you believe I've already scrapbooked all those photos that I had shown you previously? I got to work with this party collection, available at HKMC, and it made it so easy to scrap the photos. Such cute chipboard embellishments and the papers are so cute. I love the cupcake and party hat papers the best. Just one pack of 3D embellishments pulls these pages together.

Your Day
 So many cute photos and elements, I had to do a double layout. I kept it simple and the papers are pretty subtle, so do not take away from the photos, yet let you know they are party papers. The title is actually a ready made embellishment from the same line and after I put it down, I realised I had used the same title for hubby's birthday page the week before. Oh well...
 Such cute chipboard party hats and love the scrabble border, which I cut from a full sheet of paper.
What party is complete without balloons. Just had to have some - again from the 3D embellishment pack.

Products Used
Papers and 3D embellishments from Crate Paper Party Day collection
Cardstock from Bazzill

Thanks for looking,


Friday, 22 March 2013

eCAL Class Projects

Hi there,

So tired this week. I've been doing two separate evening classes on Tuesday and Thursday, finishing off after 11pm each time. Apart from that, there have been cupcake orders and trying to get errands done.

Tuesday evening's class was a re-run of the mini art journaling album that I taught all the way back in September last year. Apparently, there was a wait list and it turned out to be another successful class. This time, I combined parts 1 and 2 into one four hour class. Intense!!

Last night, I finally got round to teaching the eClips eCAL class. This was mainly a class on how to use the Sure Cuts A Lot program properly and was set for those who had purchased the eClips. Everyone had to bring in their laptops, with the latest eCAL version loaded and ready to go. I focused the class around three sections: learning how to design elements from scratch or the library, importing svgs and jpgs for editing and cutting, and learning to use Print2Cut. If you want to learn more about this cutting software, have a look at www.craftedge.com.

I created two projects to showcase some of the functions; one is a layout, and the other, an Easter card.

Hoppy Easter Card
 All of the elements used in the card were imported, either as an .svg file or .jpg file found through a google image search.

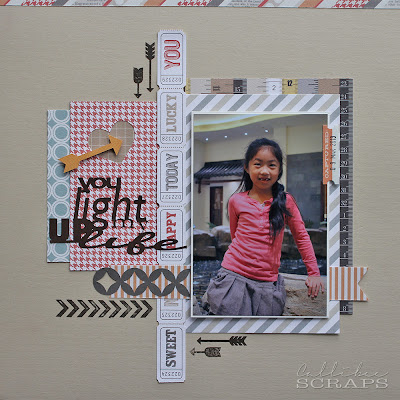
You Light Up My Life
I like the simplicity of this layout; just a few papers and then some elements cut with the eClips, plus some stamped arrows.
I joined up several different fonts to make the title. The arrow and heart were also cut with the eClips.
The grey linked circles were created with some of the shapes that are already in the eCAL library.

Products Used
Patterned papers from Teresa Collins He Said She Said collection
Cardstock from Bazzill
Various arrow stamps

Funnily enough, what I thought would be a quick lesson, turned into a four hour in-depth class. Computers threw tantrums and heads were spinning at the amount of information thrown at them. At the end, everyone was exhausted, and hopefully were able to absorb even half of what was said and done. 

Definitely, a different class from my usual, but no worries, next month's classes are back to inky fingers and gluey hands.

Thanks for dropping by,


Monday, 18 March 2013

Simply Stunning

Hello all,

I'm excited to show you what I did last week. I've wanted to do another mixed media layout for a while and when the new Prima papers came in, I jumped at creating one. This was a lot of fun to do and makes me want to make more of them.

Simply Stunning
Lots of paint, inks, sprays, art mediums and plenty of texture. The frame really helps showcase the layout and can painted to match your layout. I kept mine as it came; slightly white-washed, to go with the pale colours in my layout.
 I love how the natural fibres add so much texture to the layout.
There are many layers to the textures and makes you want to touch it.

Products Used
Papers, flowers, metal Roman numerals, mini alphabet, stencil and frame from Prima Marketing
Mini wood arrows from Studio Calico
Various mediums and inks

I'll be teaching this as a class some time in April, so hope you will be able to join me when I get a date arranged.

UPDATE  Class dates have been set for 16th (Tuesday) and 23rd (Tuesday), April from 7:00pm to 10:00pm at the shop in Sheung Wan.  Spaces are already filling up, so hurry to book yours with Erika at 2559 0175 or info@hkmemorychestonline.com

Thanks for looking,


Sunday, 17 March 2013

Party Week Done

Hi there,

It's been another busy week with crop sessions, baking, planning Miss C's birthday party, running around like crazy for the party, and of course, a layout.

Miss C turned seven on Thursday this week. She's usually a bus goer, so was very excited to be a "walker". I picked her up from school and she was treated to a proper afternoon tea at TWG, before putting on some 3D glasses to watch Oz the Great and Powerful. I did have my reservations about bringing her to watch this film, as I had heard it was pretty scary - and there were some scenes where she hid under my arm, but she enjoyed it nonetheless. After that, we queued an hour for her favourite sushi. By this time, it was already eight o'clock, so we quickly gobbled down our salmon and tuna, before heading home.

Puffle cupcakes that Miss C took to school.

  Proper afternoon tea with sandwiches, cake and scones.

Since Miss C's actual birthday fell on a weekday, we held her party today. This year, she wanted Club Penguin as her party theme. It's a kid's online game, with penguins and their puffle pets, so of course I had to come up with all sorts of things penguin and puffles. Luckily, there is one toy shop that does a few items and lots of online references for me to draw from.

I allowed her to invite six friends, and they had a blast making pom pom puffles, very messy slime, enjoyed some games, ice cream and cake. It's nice to have a smaller number of kids. Much more manageable than previous years. I think next year, I'm going to take the numbers down even more and have an outing instead.

 Showing off their pom pom puffles.
 Enjoying an icecream before the cake.
Blowing out her many candles.

It really is quite stressful, planning and executing a birthday party, so I'm pretty glad that it's over for another year. Next thing to do though, is to scrapbook the events. Check back for those, as I'll be using some new papers that are coming into the HKMC shop very, very soon.

Thanks for looking,

Monday, 11 March 2013

It's His Day

Hi there,

How was your weekend? Ours has been fun - it was hubby's birthday, and he wanted to go to Macau for the weekend. I picked up Miss C from school on Friday afternoon. Boy, was she excited - she's usually a bus goer, and loves it when she becomes a "walker".

That evening, we saw "House of Dancing Water".  Hubby and I had seen it before but it was a treat for Miss C and she absolutely loved it. It was pretty spectacular; love all the water acrobatics, although I still scratch my head at the motorcycle intermission. We sat in the "splash-zone", and had fun trying not to get wet. Of course, the performers tried to make sure you got the biggest splashes.

@ the Holiday Inn Cotai

On Saturday, after a leisurely breakfast, we met up with friends and wrangled our way through the old town. Wow, crowded! Needless to say, we didn't stay too long. It took another hour just to find a taxi to go back to the hotel. In the end, hubby went back to get the cake, while the rest of us went straight to the restaurant where dinner was booked. The Macanese/Portuguese food in Macau is so good - a must try. Hubby ended the night at the craps table - unfortunately, there was no birthday luck tonight, while Miss C and I snuggled up in bed to watch cartoons.

How pretty. Strange, but pretty.

On Sunday, Miss C and I spent a couple of hours at the Qube, the indoor playground, while hubby played a bit more craps with a friend. We took a mid-afternoon ferry back to Hong Kong and spent the rest of the day just relaxing. All in all, a great weekend.

Miss C loving the slides at Qube

Of course, I had to scrapbook it. The HKMC shop has brought in a selection of CHA releases and we are working on samples for the lines. Last week, I showed you Glitz Designs Color Me Happy samples. This time, it's on to Teresa Collins. One of my favourite lines this year, is her He Said, She Said collection. We split the line up into gender and I loved working with the He Said line. Such gorgeous colours and designs.

 Your Day
 
Such a funny photo of hubby with his cake. Don't you love how the colours in this paper line come together so well?
So many cute sayings to choose from. I chose a shiny silver Thickers for the title to match.
 There are loads of die cut elements to build your page with.
See that glittery scallop border? It is so much shinier in person. It really makes the layout pop.

There are also loads of chipboard, buttons, garlands, washi tape and more, that come with the line, which I haven't used on my layout. Super cute.

Products Used
All papers, pre-cut borders and die cuts from Teresa Collins He Said, She Said collection
Silver Thickers from American Crafts

This week, I'm planning Miss C's birthday, which is only four days apart from hubby's. Since her actual birthday falls on a Thursday, we will be having her party this coming Sunday. Luckily, the parties are getting smaller, so hopefully, I'll be able to get some more layouts and projects done in between everything else.

See you soon,


And the Winner Is....

Hi there,

Thank you to all of you who joined in the fun with my 1st anniversary giveaway.  It was great to see all the emails coming in. Without further ado, the winner is:

LIZZY

Congratulations Lizzy. I'll be sending you an email so we can arrange delivery of your kit pack.

Hoping to have another one of these challenges and games very soon.


Tuesday, 5 March 2013

Christmas in March?

Hi there,

After three months, I finally hunkered down and got a Christmas layout done. Two pages, actually. What a feat. I'm not big on holiday pages and Christmas is the worst. Don't get me wrong; I love Christmas as a holiday, but I seem to difficulty when it comes to scrapbooking the event. Dark, indoor, repetitive photos and so many that I don't know which ones to put down on the page.

For this double pager though, I have two wonderful subjects, so it was easier to get done.  When Miss C and her cousin get together (which is not often as one lives in the UK and one here in HK), they are thick as thieves. It's so nice to see the interaction. Like brother and sister, without the fighting. I guess it's because they only see each other for a few weeks out of a year.

Naughty? Nice?
 I don't usually do a lot of double layouts, but this one had too many cute photos not to be included. I did them both in contrasting papers, but kept the embellishments similar to keep it cohesive.
 I was originally going to do two separate layouts, but in the end, decided to combine them both.
 That way, I could add in more photos, and not worry too much about embellishments or a title space.
 The chipboard, brads and papers are super cute.
What could be better than Father Christmas on skates?

Products Used
Papers, mini letter stickers and brad from Bo Bunny Mistletoe collection
Chipboard embellishments from MAMBI
White cardstock

I know for sure I have one more Christmas layout to do for 2012. Let's see what time of year that one gets done. Haha.

Thanks for dropping by,


Sunday, 3 March 2013

Quick and Simple Layouts

Hello,

If you've looked at my layouts, you will see that I prefer layering, fussy cutting, inking, some stamping and distressing. Most of my pages take three to four hours or more to do. It's not always easy to find such a stretch of time in one go, so, once in while, I have to do quick layouts. Ones that take half an hour to an hour, from start to finish. It's so satisfying to get several pages done in a day or two, especially on the weekends when I have to fit it between spending time with the hubby, child and two cat babies.

For these pages, I've kept embellishments to a minimum, mostly just using my trimmer to cut out the paper and sticking it down. There is minimal layering, using the contrast of colours and patterns to build the layouts instead.

The first two layouts feature new winter CHA release, Glitz Design Color Me Happy, which are in the HKMC shop right now. I had four pieces of paper and just a handful of embellishments (semi transparent overlays and die cuts, a roll of washi tape and a roller stamp) to work with, but they were so colourful and a little goes a long way.

Hello
The paper comes with the rainbow stripe frame, which already takes out half the work. I love all the colours of this paper line.
 I jumped for joy when I saw the air balloon. I just love them. The black arrow tags were cut from another of the Glitz papers.
 How whimsical are all the elephants - this big one reminds me so much of Elmer the Elephant, with its patchwork pattern.

Products Used
Papers, diecuts, overlays, washi tape from Glitz Design Color Me Happy collection

Loving This Moment
 I love the contrast of the rainbow colours with stark white cardstock. It just makes everything pop.
For the masked area, I taped off a section of a 12"x12" stencil before misting with several colours. Let it dry and then use the stencil to outline the pattern in black pen. Easy as that. For the multi-coloured arrow tag, I coloured each raised section on the roller stamp with distress markers, and rolled out onto a spare piece of card before cutting it out.
 The title was cut using my eClips. I wanted a subtle title, hence the light grey.

Products Used
Papers, diecuts, overlays, washi tape and roller stamp from Glitz Design Color Me Happy collection
White cardstock from Bazzill
"Paradise" Template from Crafter's Workshop 
Colour spray inks from Dylusions for Ranger Inks
Wooden camera from Kaisercraft

Underwater Diva
 For the last layout, I love this photo so much and wanted it to be the main focus, so all other elements were kept to a minimum. I also like the kraft colour chevron that contrasts nicely with the blue backing.
I stamped the "documented" on one of the patterned papers and cut it out. The acrylic bracket is anchored in place by some stitching.
I used a 6"x6" chevon mask to add some light molding paste for a little more dimension. This was also very quick. Once you've figured out how you are going to lay out your page, take everything off and just add the molding paste in small areas, where you know they will still be seen. A quick blast with a heat gun will set it and then place everything else back on.

Products Used
Papers, flowers, word stickers and black mini letters from Pebbles Inc. Walnut Grove collection
Mini blue letters from AdornIt (discontinued)
Clear acrylic bracket from Bo Bunny Chunky Charms
Documented stamp from Kelly Purkey stamps
6" x 6" Herringbone template from Crafter's Workshop
Distress Ink by Tim Holtz for Ranger Inks
Teal threads

There we are. Three layouts in two days. So, challenge yourself to try and get a few more pages done, quickly and simply. Minimum cutting, minimum fuss.

I'd love to see what you come up with.

Thanks for looking,


You might also like

Related Posts Plugin for WordPress, Blogger...