Monday, 31 December 2012

Happy New Year Everyone

Hello All,

How was your Christmas? Is everyone stomachs groaning in protest over the massive amounts of food consumed in the last few days? I know I am and we still have a few more big meals to get through before going home on the 3rd. I swear, once we get back home, I am putting hubby and I on the strictest diet.

 Miss C on the way to Santa's Grotto on Christmas Eve morning.
 Huge swan at Painshill Park.

We had a wonderful Christmas day; seventeen of us crammed in the dining room, which was beautifully laid out by my father in-law. There was the ubiquitous crackers, turkey and stuffing and to end it all, an over-doused Christmas pudding which wouldn't go out for ages. We were actually afraid the plate would crack from flaming so long.

  Reading a letter from Santa.

The evening saw us all sitting in the front room opening our presents. Whenever we spend Christmas in the UK, rather than buying for everyone, we do a family secret Santa for those who want to join in. Kids were exempt of course, and they had the most fun tearing open the wrapping. Poor things; we made them wait the whole day. The only thing they could open in the morning was "Santa's" present. Miss C asked for a specific princess dress but she got a different one - not too pleased about that but she soon came round and now wants to wear it all day, every day.

 Opening presents after lunch. There's the princess dress.

The next day was spent recuperating from our food comas before the boxing day feed at my sister in-law's. I contributed with the largest Eton Mess trifle ever - so good! 

Every time we come back, I request three things: a British Chinese take-away (have to really - it's just so different from what I get back home), an Indian curry (they do make the best here) and a proper pub lunch. We did the first on the second night here, the curry on the twenty-seventh and the pub lunch (roast pork with apple sauce and a huge yorkie) yesterday. I'm happy.

On the twenty-eighth, hubby and I got a real treat - we had to go for a business lunch meeting in London and we ate at the Savoy Grill (a Ramsay restaurant). Very nice indeed. The menu was simple but everything was so well done and the service impeccable. I didn't dare whip out the phone to take pictures though - didn't seem like the sort of place to do that, you know?

Yesterday, a bunch of us drove all the way down to West Wittering beach in West Sussex. We all thought it would be a good idea to go for a leisurely walk by the sea, in the middle of winter. Yes. Well, let's just say, we were all frozen by the end of the walk and had sand in every crevice unmentionable, but at least the rain held off and we even got a decent amount of blue sky. This was followed by the lovely pub lunch I mentioned earlier.

 Down at the beach in West Wittering. Freezing cold.

Today, I'm staying in most of the day. We'll be ringing in the new year at a friend's house (bless them for offering up their place to thirty of us). We're having an hors d'oeuvres competition (can't remember who suggested this), so I plan to do a corn fritter topped with prawn, with tomato relish.

It's been a great trip so far - it's so good to be able to spend time with family and friends. I know hubby really misses this side of the UK and Christmas, especially, is very important to him. Just a few more days before we go home. Four days there, and I'm back on a plane to LA for the winter CHA! YAY!!

Miss C and I both miss home and Jake cat and of course, just being back in our own space.  To think - I'm planning on coming over for the whole six weeks of the summer holidays next year. We'll be outstaying our welcome at the parent in-laws then.

To round up my post, I wish everyone a prosperous and happy new year and all the very best for 2013.

Happy New Year everyone,


Sunday, 23 December 2012

Merry Christmas Everyone

Hi all,


It's two days to Christmas and I'm sitting in the sister in-law's warm kitchen in England. Nice and quiet, except for two noisy kids (mine and her cousin), so not too quiet at all. I'm still fretting about last minute presents and second guessing myself on what I've gotten whom - hoping everyone will be pleased with what they get.

I love coming to the UK for Christmas and catching up with family and friends. It's such a different life from what we live in Hong Kong.

Yesterday, we witnessed hubby's parents renewing their vows after 50 years of marriage. It's amazing to see that kind of commitment and love after so many years. My own parent's celebrated 60 years of marriage this year and I see the same love and devotion in them. It's something admirable to behold, indeed. I hope we will be able to see this kind of future for us four or five decades down the line. At the moment, we are still a year off the ten year mark.

We'll be taking the kids to see Father Christmas tomorrow morning before going for lunch at a friend's place. Both kids are super excited and it's so wonderful to see them get into the Christmas spirit. Hope I'll be able to get good photos off my iPhone.

Speaking of which, I brought my DSLR with me but didn't think of bringing my charger as I had a full battery. Unfortunately, when I went to turn it on, the battery has discharged itself on the flight over. Boo! I will have to deal with iPhone photos for the rest of the holiday. I just hope they will be good enough to scrapbook later on.

Just to finish off, my November layout was again selected as one of the featured layouts for the My Creative Sketches challenge (thanks MCS), so I can again paste a blinkie on my post, as you see above.

 Featured Layout - Picture Perfect Fall Day

I brought a very limited amount for scrap tools and materials with me as I have a few layouts to finish before January. Hope I'll be able to work on them and post before the end of the year.

Wishing you all joy and peace for the holidays and very Merry Christmas and happy new year.

Thanks for stopping by,

Tuesday, 18 December 2012

Ornaments Class - Review

Hi all,

Christmas seems to be galloping at us at high speed and I can imagine everyone is rushing around filling those Christmas gift lists, planning menus, attending parties and for us crafters - making Christmas cards, decorations and ornaments. I know I am.

When it comes to decorations, self made ones are the ones that are treasured the most. It makes the season more meaningful. I've done mini trees, a canvas, cards and ornaments.

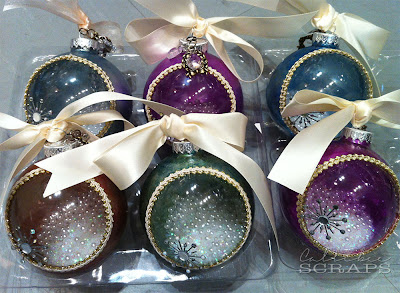
Last Thursday, I held my ornaments classes; one session in the morning in DB and one in the evening in Sheung Wan. We made three different ornaments; one round glass bauble, a tart tin based bauble and a canvas based one.

Christmas Ornaments
 These were the one I made up for the class.
Here we are all putting our glass balls together. We even had a student all the way from Singapore join us for this class.
 All the gorgeous ones from the evening class. The glass balls were covered in alcohol ink before adding trim and trinkets. I love all the jewel colours we got. So beautiful.
Lovely tart tin ornaments. I love all the pinks, blues and greens. The papers were die cut and the snowflake was cut by the eClips. The whole thing is surprisingly light, so won't drag down your branches.

I didn't get a chance to take pictures of the canvas ornaments, but everyone managed to make two to three of them each.

That was my last class for this year. Hoping to bring more fun and interesting projects to share with you next year. We'll be leaving for the UK on Thursday, but I'll be lugging my outstanding projects with me to do, so I may have one more post before the end of the year.

In the meantime, I wish you all a very Merry Christmas and all the best for the new year.

Thanks for looking,


Monday, 17 December 2012

12/12/12

Hi all,

Last Wednesday was a once in a lifetime date. 12th December 2012 - 12/12/12.  Did you do anything special for this unique date?

A bunch of us got together on the 12th to do a 12/12/12 Christmas canvas. Each of us had twelve main elements to place on canvas. There were reindeer, ornaments and trees. I chose tin soldiers for mine. Angela Collingwood also chose soldiers and she backed them with guard houses. I decided to keep it simple and did glittery blue shaped tags on mine.

 The canvas is very long at 100cm x 20cm. Perfect for that sliver of wall. Some of us did our canvases horizontally, while others did theirs vertically.
 The canvases were mod-podged with Christmas papers and allowed to dry. After that, layers of acrylic paints in favoured colours. I kept mine pretty light so the bottom paper would still show through. I then added silver acrylic paint around the edges and dabbed on some pearl mica flakes. I also stenciled on silver glitter glue through a circle template.
 The soldiers were die cut and pieced together after distressing with black soot. I die cut, embossed and painted the backing before covering them in blue glitter. I love how the embossing shows up in certain light under the glitter. The soldiers were then stuck on with hot glue and I added mini wreaths and die cut numbers to finish off.

Products Used
100cm x 20cm blank canvas
Papers from Making Memories (not sure which line)
Mod-Podge
Silver and green acrylic paints from Kaisercraft
Pearl mica flakes medium from Golden
Silver and blue fine glitter
Embossing folders by Sizzix
Chequered Dots Template from Dylusions Stencils for Ranger Inks
Cardstock from Bazzill and Core-dinations
Black Soot Distress ink from Tim Holtz forRanger

Hope you'll try something similar. It was a lot of fun. This will be used to count down the twelve days of Christmas and can be taken out every year to be used again and again.  In fact, why not do one of these for every occasion?

Thanks for dropping by,


Sunday, 9 December 2012

Not So Traditional Christmas

Hi there,

If you know me, you know I love my scrapbooking. Duh...  But you'll also know that holiday layouts are my nemesis. Christmas, birthday, Easter and Halloween layouts are my downfall.  I never seem to be happy with the outcome with them. Maybe it's because they are always in the same colour palettes; red/green for Christmas, pastels for Easter, orange/purple/green for Halloween. Or, it could just be because, they are the layouts that "have" to be scrapped, whether you want to or not. Whichever it is, I still have a couple of years of Christmas's that I have to put down on paper.

You can imagine my joy when I could do a Christmas layout in other colours. This one is predominant pink!! Yes! A pink Christmas layout. What more could you want.

 Merry & Bright
 See? Pink! Matches my Miss C's dress perfectly. She looks like a little princess here.
 The title was one long chipboard banner which I cut in two. I also used my eClips to cut the big "&" to place behind. I think it looks almost tree-like.
Note to Self: next time - put your layout somewhere safe, where the Jake cat can't treat it as a mat!

Products Used
Papers, chipboards and stickers from Echo Park Holly Jolly Christmas 2011 collection
Bling flourish from Zva Creative
Icicle Stickles from Ranger Inks

Thanks for looking!


Saturday, 8 December 2012

Another Week of Baking and Caking

Hi All,

Hope you all had a good week. Monday was taken up with a crop session. We usually do one at my place on Fridays, however, since I had two cakes to do, we changed it to Monday. Just a few of us - eating, chatting, having a laugh, and sometimes, even getting one or two layouts done. I'm usually having too much fun to actually finish a layout, but I always do finish it later.

This week has been filled with baking and caking, so I'm going to bombard you with a few pictures of the cakes I made. I did a batch of M&M cookies for a Red Cross charity bake. These cookies are so yummy - crisp on the outside and chewy on the inside. They bake up so well and are very easy to make.

 If you'd like to try out this recipe, I got it from here. I substituted the chocolate chips for the M&Ms and left out the nuts. Do try the original recipe too.

I then spent Wednesday evening baking for two cake orders, and Thursday and Friday building and decorating the cakes. These ones were very fun to make. I don't do a lot of tiered cakes, and I love them.

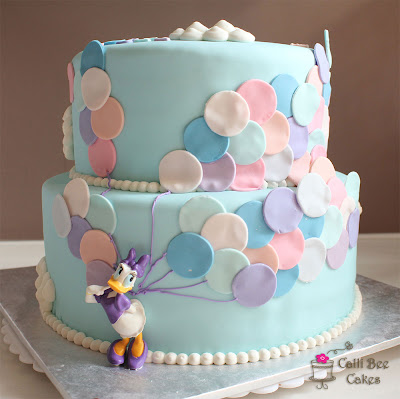
Daisy with Balloons
This was based on a cake by The Cake That Ate Paris.  The client loved the design and wanted it replicated, but with a Daisy Duck.  I think it worked out pretty well.  The inside is vanilla cake with chocolate buttercream.
 Here's the top view.

Ballerina Cake
 The birthday girl loves ballerinas, so what's better than a pretty cake with flowers, hearts and a little ballerina sitting on top. This cake was chocolate with chocolate buttercream.
 
This is my first ballerina - I still need a lot of practice for my figurines.

Next week's cake fell through, so hopefully, I'll be able to do more scrapbooking instead.

Happy weekend!


Saturday, 1 December 2012

HK Memory Chest Kit Club - December 2012

Hi there,

It's the end of another month and time for the reveal of our HKMC December kit. As much as November's kit concentrated on neutrals and smaller patterns, the December kit is the complete opposite, brimming with bright primary colours and vintage images.  Oh, and all the yummy goodness of chevron, gingham and honeycomb patterns. Perfect for those girly pages and yet have enough bold patterns for those boy pages.

December Kit
2 sheets Glitz Design Cashmere Dame "Chevron"
2 sheets Glitz Design Cashmere Dame "Floral"
2 sheets Glitz Design Cashmere Dame "Cherries"
2 sheets Glitz Design Cashmere Dame "Banner"
1 sheet Jenni Bowlin Coredinations - Core Amour - Row of Cherries
4 pcs Glitz Design Cashmere Dame Giant Rhinestones
1 pack Glitz Design Cashmere Dame Crepe Trim
1 pack Glitz Design Cashmere Dame Teeny Alphas - Black
1 pc Glitz Design foam stamp
1 pc co-ordinating Washi tape

Add-On Options
Glitz Design Cashmere Dame "Gingham"
Glitz Design Cashmere Dame "Honeycomb"
Glitz Design Cashmere Dame Washi Tape
Glitz Design Cashmere Dame Teeny Alphas - Tiffany Blue 

December Sizzix Die
Tim Holtz Alterations Movers and Shakers Die - Mini Silhouettes

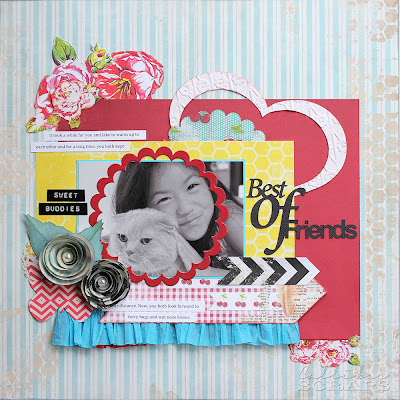
Best of Friends
 My two little babies bonding. I love the combination of primary colours intermingled with romantic florals and bold patterns. The cute blue crepe paper adds a bright visual to anchor the layout.
I covered some card stock with washi tape before punching out the butterfly. The flowers were my inspiration for this project.
The red scalloped frame was cut out with the Spellbinders scallop dies. I then covered it with Glossy Accent to give it that shine.
This title was designed and cut with the eClips.

Extra Elements: Dymo tape, black cardstock

Super Duper Cherry Pie
 I've had this photo of Miss C goofing around for ages and it always makes me smile. I thought these were such fun papers to go with a fun photo. I coloured the chevron paper pink to add more colour. I love the Jenni Bowlin coredinations paper; you can distress it as much as you like and it adds a subtle texture to the background.
 
Check out the cherry paper. So cute. I also love the teeny alphas; they're like baby sized scrabble tiles.
 I turned the crepe paper into a rosette and the giant rhinestone says it all.

Extra Elements: Pink Glitter Foam Thickers

Walk For Good
 
Another lot of photos that have been waiting to be scrapped for ages (try four years)! I backed the papers with grey cardstock and it really makes all the colours pop on the page.
The tiny blue alphas go great with the black puffy letters I added for the title.
I'm loving sequins at the moment. Just a sprinkling of them adds amazing dimension to your page.

Extra Elements: Black puffy Thickers, sequins

Here are the layouts from the rest of our wonderful DT.

That's How She Rolls by Angela McDaniel
4th Birthday by Angela McDaniel
A Day To Remember by Erika Lui

My Flower Fairy by Erika Lui
Handsome by Angela Collingwood
 Christmas Ornaments by Angela Collingwood

We also hold free crop sessions for kit club members; to check out the samples and get some guidance if you so choose. The December crop sessions are as follows:

Discovery Bay Crop
6th December (Thursday)
10am - 12pm
Hosted by Angela McDaniel

Sheung Wan Crop
11th December (Tuesday)
10:30am - 12:30pm
Hosted by Grace Wong

11th December (Tuesday)
7:30pm - 9:30pm
Hosted by Erika Lui

If you would like to join the crop or if you want to sign up as a new kit club member, give Erika a buzz on 2559 0175 or email her at info@hkmemorychestonline.com.

Hope to see you there.


Friday, 30 November 2012

O Christmas Tree, O Christmas Tree! - Tutorial

Hi there,

It's so easy to fall back on ready made ornaments and I must admit most of my decorations are store bought. This year, I promised myself I would do more Christmas projects instead. Ironically, we won't be putting up a tree this year as we are off to England for the holidays, so I thought I'd do a couple of baby trees to put on my pseudo mantlepiece.

With amazing foresight (something that usually eludes me), I bought two foam trees from Michaels when I was in New York last month and made two cute little trees. Now, you don't really need the cones. You could very easily make one out of just cardstock - roll it up into a cone shape and cut off the excess so it will stand up straight. The good thing about the foam cone is, you have a solid base to work on and you can mount the cone on a stem. I used a simple tea light holder.

Little Christmas Trees

I decided to make a tutorial for them, so here we go with a step-by-step.

For the larger scalloped tree, this is what I did:

 Punch out a load of 1" circles in four co-ordinating colours
Holding each colour stack firmly between your thumb and forefinger, ink the edges in a corresponding colour. You can see the difference it makes on the left-hand stack. It's subtle, but it helps hide the white core of the paper.
I papered my cone before adding my circles so they gripped better. Any paper will do as it will be covered. Spread a generous line of glue around the base of the cone and stick each circle on, one by one, leaving a semi-circle off the edge. When doing this, use a strong wet glue that has a short setting time, yet malleable enough so you can maneuver the circles to space them evenly if you need to.
 For the next layer, add a thick line of glue just above the first row of circles. Do not place the glue on the circles themselves. Place your second row of circles between the first row so they are staggered. Carry on with the third row and so on until you reach the top. You will have to reduce the number of circles per row so the scallops will look even.
 Here's the tree all scalloped up to the top.
 Once the glue is all dry, you can use your finger or a tool to slightly curl the "leaves" up a little so they stick out from the tree.
 Add a line of glitter glue to the edge of each leaf to give it definition and shine.
 Mount your cone on a stand or a candlestick to finish.

Products Used
Foam cone from Michaels
1" Circle punch from Martha Stewart
Papers from Kaisercraft Christmas Cracker collection
Distress Inks from Tim Holtz for Ranger Inks
Icicle Stickles from Ranger Inks
Stand - this is up to you but candlesticks are the easiest option

For the second tree, I did little spiral flowers instead.

 I chose four different patterned papers and cut them into 3" x 3" squares. If you have a 3" circle punch, it will makes things easier. I don't, so I traced around a glass.
 I then cut a spiral into the paper until I reached the centre.
 With the aid of a pencil or paintbrush handle, I curled the spiral from the outer end into the middle.
 So cute. They look like little snails shells
 This part is best done with hot glue. Squeeze a dollop on the centre of the florette and stick the bottom edges of the curled spiral down, making sure they are evenly spaced and tight.
 Once you have your flower intact, dip the top edges in some white glue. For better control, I used a foam brush to swipe the glue on the edges.
 Quickly dip the glue covered flower into matching glitter, tapping off the excess.
 Continue dipping all your flowers in glitter and allow them to dry before assembling.
 For the cone, I again papered it as there will be gaps between the florettes and you don't want the white foam core to show through. A dark coloured paper will make gaps look more unnoticeable.  Again, if you don't have the foam core, you can create your cone with cardstock.
 I glued a circle of lace and silver beads around the bottom of the cone to disguise the edge.
 Starting just above the lace border, I hot glued the florettes next to each other as tightly as possible.
 Keep glueing them down, staggering your colours around the cone, until you reach the top.
For the star, I traced and cut out two identical stars. I folded them so they would pop up, like the picture. I then used a strong glue around the inside edges and stuck both sides together, like a clam. You will need to hold them together with your fingers until they set. You can also stick a skewer into the bottom of your star if you want. I did this as I could then stick the star into the top of my tree. Sorry, I forgot to take pictures of this stage.
I then spread glue on the whole star and covered it with silver glitter. Once it's dry, skewer it to the top of your tree. If you haven't used a skewer, you will need to hot glue it to the tree to stabilise it.
 
 I again stuck a stemmed candle holder to the bottom to elevate the cone.

Products Used
Cone from Michaels
Papers from Echo Park Winter Wishes collection
Glitter, lace and beads sourced locally
Candle holder or candlestick

So there you are. Two different trees. I love the contrast between the pastel coloured scallops and the bolder colours for the flowers. It is time consuming and repetitive, but the final result is quite stunning and well worth it. I would love to see what you come up with.

Thanks for dropping by,


You might also like

Related Posts Plugin for WordPress, Blogger...