Friday 13 February 2015

Chinese New Year Lantern

Only a week left to Chinese New Year; lots of puddings and food to prepare, lai see (red) packets to stuff with money and new outfits to purchase. Before all that though comes the crafting. Belly Lau from HK Memory Chest created an awesome Chinese red lantern and it is available as a kit, with instructions on her website.

It was so much fun to put it together and it is so pretty. I just love the little ornaments on the top of the lantern and all the beaded charms.  You can even stick some miniature photos to the inside.


The kit includes everything you need in order to make this lantern and only comes in at HK$380.00 with free shipping (in Hong Kong). Order here for your kit now.

Tuesday 10 February 2015

Valentine's Day Cards

Quick, take my temperature! I did the unthinkable (for me) and made some cards. Not just one, but three! I think all those card making videos on You Tube has been getting to me. Even now, I have split screens on my laptop, watching Nichol Magouirk videos while I'm typing.

Valentine's day is just around the corner and it's a perfect occasion for me to do some cards and some colouring as well.

Valentine's Card 1
For this card, I used kraft paper as the base. I then cut out a heart on my pink polka dot paper, layered on a piece of acetate and framed the front of the heart with another die cut red heart. I added a foam tape "dam" to the back surrounding the heart and added beads and sequins to make a shaker card.
 The pair of elephants are too adorable and small enough for me to colour. I don't have the coordinating dies so had to cut them out by hand. Well worth it I think as they are just too cute. This card will be for Miss C.

Products Used
Kraft cardstock and red cardstock
Pink polkadot paper from My Mind's Eye Lost & Found Two Blush 6"x6" paper pad
Nesting Heart dies from Sizzix
Stamps by Lawn Fawn Love You Tons
Elephants coloured with Spectrum Noir markers
Mini sequins and microbeads from stash

Valentine's Day Card 2
 The second card will be for the Mister. I chose some masculine colours and patterns, die cutting the heart three times with three different papers and inlaid the negative space with the dark brown pattern and red card stock.
I distress inked the beige pattern card and laid it on a red matt card. I also added some clear Wink of Stella on the red roses. The words were die cut from another stamp/die set.

Products Used
White and red cardstock
Patterned papers from My Mind's Eye Lost & Found Two Blush 6"x6" paper pad
Lace Heart Sizzlits die from Sizzix
Words stamped and cut from Hello Sizzix Framelits 
Frayed Burlap distress ink by Tim Holtz for Ranger Inks
Clear Wink of Stella

Valentine's Day Card 3
 This is my favourite of the three. Haven't found a Valentine's for this card yet - might keep it for myself. The typewriter is too cute. I stamped and coloured that and the envelopes before cutting them out. I then stamped the typewriter paper with the LOVE.
For the pink background paper, I chose one with a tight pink pattern and stamped the pink circle all over the paper (which I then promptly stuck on upside down - sigh). I added two strips of brown patterned papers on the base before sticking on the typewriter, envelopes and a few sequins and hearts.

Products Used
White and pink cardstock
Patterned papers from My Mind's Eye Lost & Found Two Blush 6"x6" paper pad
Stamps and die set from Pink Paislee Pen Pals collection
Red enamel hears from Doodlebug Design
Typewriter and envelopes coloured with Spectrum Noir markers
Distress Inks in Worn Lipstick and Frayed Burlap by Tim Holtz for Ranger Inks

Hope you liked my cards and I would love to see some of yours too.

Thanks for dropping by and Happy Valentine's Day.


Saturday 7 February 2015

Sweet This Day

After a full January, we can look forward to another busy February with ballet performances, Valentine's Day and Chinese New Year just around the corner - haven't started doing my Chinese puddings yet. Still finding time for our weekly Thursday crop sessions at my place which is great as it gives us all a focused time to create.

Sweet This Day
I've had this kit sitting in my stash for a few months and OMG, it is so beautiful. Gorgeous photo reaslistic backgrounds with bokeh effects. I love the golden wheat against the blue bokeh sky. The photos were taken last summer on our annual strawberry picking trip in England. We have it down to an art now.
 I added some molding paste through a weave stencil before using the distress marker spritzer tool. I cut out the square titles tiles and added a bit of washi to one of them.
I die cut the strawberry plaque with a scallop die. The flowers are so pretty and match the papers well.
I also added to fish tail banners in the wood effect paper and placed lots of sequins around the page to mimic the bokeh effect.

Products Used
Papers and stickers by Webster's Pages Strawberry Fields
Flowers from Petaloo
Basket weave stencil by Prima Marketing
Distress marker Picked Raspberry and Spritzer tool by Tim Holtz for Ranger Inks
Wooden butterflies by Studio Calico
Sequins from stash
Light molding paste by Golden

Thanks for dropping by,


Tuesday 3 February 2015

Miss You

Start of a new week and a new layout. I was going through my photos deciding what to scrap when I came across some cheeky photos of Miss C and her cousins taken last summer and that reminded me how well they get along together. We only see them once a year, if that and I know they miss each other a lot.

 Miss You
I love the blue background paper, perfect for a boy/girl combo. I love the funny faces the kids are pulling in the photos.
I brushed on some gesso before spritzing with some Color Shine. I doodled a bit on the word stickers just to give them the extra pop as they were so close in colour to the background paper.
I haven't used my punches for a while, so decided to use several of them to create interest to the paper strips. I staggered a bunch of gold glitter banners along the bottom of the strips.
A little sketching/doodling around some of the elements and layers add some interest to the layout.

Products Used
Papers and Sticker Accents from Pebbles Jen Hadfield Home Made collection and American Crafts Shimelle collection
Jillibean Soup Blue Happy Wise Words Stickers
Glitter chipboard letters from American Crafts
White Gesso from Golden
Color Shine Primrose and Georgia Peach sprays from Heidi Swapp
Distress Markers and inks from Tim Holtz for Ranger Inks

Thanks for looking,


HK Memory Chest Kit Club - February 2015

Wah, wah, wah. I have seriously been lacking on the scrapbook front. Apart from the layouts for January's kit, I've not done any scrapbooking in January. Partly because we were away from the 7th to the 20th; first in Singapore and then in Japan (I know, we travel a lot) and also to sheer laziness.

Yup, I admit it - I've been having a great all time spending my free time watching You Tube card tutorials rather than creating. Funnily enough, I'm not a card maker, but I love to watch the process. These ladies are super talented and their video deliveries are concise and watchable. My favourites - Jennifer McGuire, Nichol Maqouirk, Kristina Werner, Vicky Papioannou and Shari Carroll. Do you have your favourites?

Anyway, back to the creating that I did do - the February layouts. This month's jam packed kit brings in the diamond/gem trend which has been seen around CHA 2015 this year. It's also perfect for Valentine's day cards or layouts - diamonds = engagements - that's what I think anyway.

February Kit 2015
We R Memory Keepers Shine - Sparkle
We R Memory Keepers Shine - Blessings
We R Memory Keepers Shine - Glisten
We R Memory Keepers Shine - Inspired
We R Memory Keepers Shine - Well Worn
We R Memory Keepers Shine Acrylic Shapes
We R Memory Keepers Shine Journaling Cards
Gossamer Blue On My Desk Puffy Stickers
Teresa Collins Designs Life Emporium Die Cut Cork Shapes
Petaloo Textured Elements Burlap Poinsettia
Dear Lizzy Phrase and Letter Stickers
Amy Tangerine Oxford Embroidery Stencil Set
Amy Tangerine Shaped Paper Clips

Optional Add-ons
Gossamer Blue Double Sided Cardstock – You’re a Gem
Gossamer Blue On My Desk Gold Foil Vellum
My Mind’s Eye Julibee Mint Juleb Double Sided Cardstock – Wild Ampersand Foil
Freckled Fawn Enamel Stars
My Minds Eye Market Street Chipboard Stickers
Sizzix Bigz Dies Mug & Spoon


Here's the sketch I designed for this month:


Yokai Fun
I love the starry paper; it's so fun and can be used in so many ways and not too overpowering. The photos were taken in Sakaiminato, Japan, the home town of famous Yokai cartoonist Mizuki Shigeru. Yokai are Japanese folklore monsters and ghouls.
I cut out the gold blooms from the velum add on and they really pop around the page. I added gold alphas to tie the gold elements together.
The puffy stickers are too adorable and they feel so soft, I couldn't stop touching them. The diamonds, I cut from one of the add on papers and gave them a brushing of clear Wink of Stella to make them shimmer.
The cork board pieces add a natural texture to the page and I cut the staggered quote from one of the provided cards. More puffy stickers to round out the layout.

Love & Be Happy
 This month comes with a fun embroidery and template kit from Amy Tangerine. This inspired me to do a stitched patchwork layout, using complimentary colours. I kept the layout pretty simple otherwise, with few embellishments.
I love the contrast of the cork board and acrylic. I used the #be happy card as part of the title. The little glitter stars are so cute and match the papers perfectly.
 The sweet clouds were part of the embroidery kit and even though I'm not much of a sewer, I thought these were well worth the effort. I then inked the edges with distress ink to give them more definition.
I die cut the "captured" on kraft paper and layered it three times to give it a chipboard feel. I cut a slit in the grid paper so I could slip the paper clip end of the camera in.

 Enjoy Today
 I love the background paper for this layout. It already has a ready made layered look, so I wanted to keep more of that showing through on the left side, so I layered my photos and elements mainly on the right.
I kept this side simple with see through acrylic elements and the title stickers. I did splatter gold and white paint over the page as I felt the open areas were a little stark.
 I love the red flowers and although they are poinsettias, I felt they could be other than for Christmas layouts. I just love the burlap look of them.
I drew and stitched a giant diamond to go behind my main focus area and I think it turned out really well. I used this month's die set for the mug and spoon and cut the horse from one of the cards in the kit.

Gift Card Holder/Card
I had lots of paper left, but didn't want to do another layout, so I decided to do a quick card. I used the coffee mug die again to make a tri-fold card. I stuck the bottom half of the mug on the lower flap and the top flap tucks in behind it. As the reverse side of the red gem paper was a dark green wood grain, I layered the diamond paper on the inside to brighten it up. I die cut a pocket from the gold blossom vellum and placed a gift card inside (it's just a dud; plan to change it out to a proper gift card when the time comes to give it away). I added a birthday banner on the pocket and drew a gold stitched border around it.


Here are some of the projects from the rest of the team:

Things That Make Me Smile by Belly Lau

You and Me by Belly Lau

Mini Album Pen Holder Set by Belly Lau

Be True To Yourself by Erika Lui

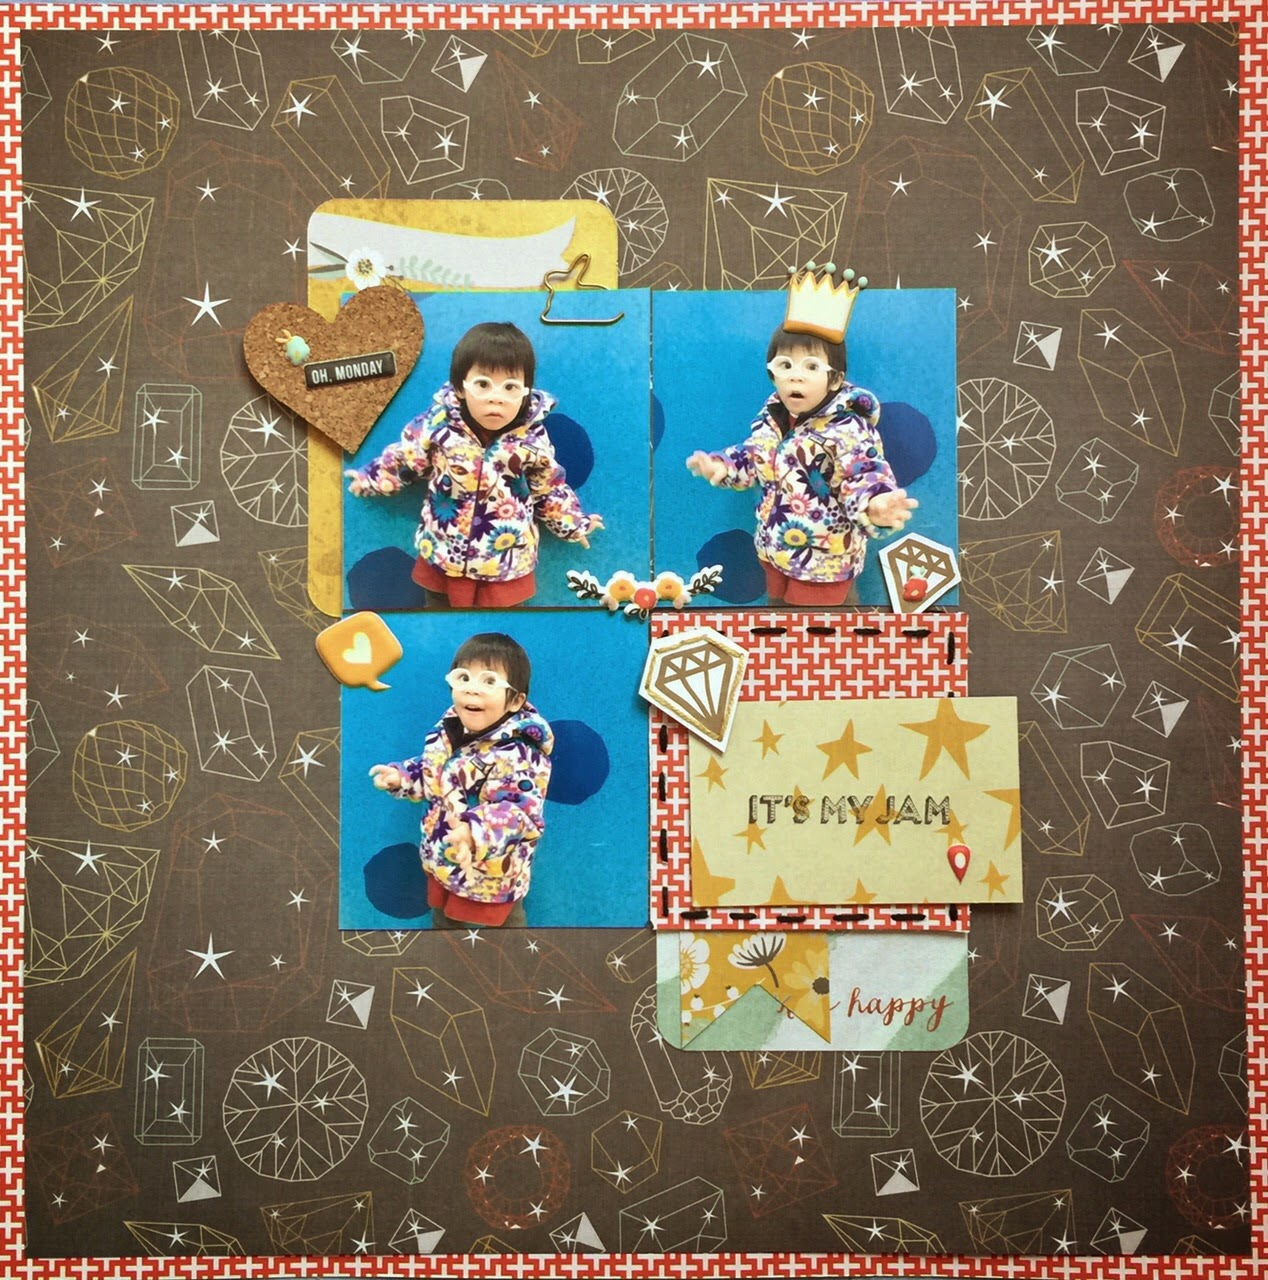
It's My Jam by Erika Lui


Chai Wan Crop
10th February (Tuesday)
10:30am - 12:30pm
Hosted by Grace Wong
12th February (Thursday)
10:30am - 12:30pm
Hosted by Belly Lau

Hope to see you at the crop and happy scrapping.


You might also like

Related Posts Plugin for WordPress, Blogger...